So you’ve officially landed your first few mobile detailing customers. That’s exciting—but also a little intimidating. You pull up to their location and suddenly a lot of questions start running through your head.
Where do I park?
What do I say when I arrive?
How long should setup take?
What should I check before I even start working?
How do I make sure everything goes smoothly without looking unprofessional?
If you’ve ever felt unsure about those things, you’re not alone. In this video, I’m going to walk you through exactly what I do when I arrive at a customer’s location for the first time—from confirming the appointment, to parking, to setup, to wrapping up the job.
This is a general framework you can follow so your workflow stays smooth, efficient, and professional, especially when you’re just starting out.
I’m Oscar with Detail Group.co, where I help detailers start and grow profitable car detailing businesses. If you find this helpful, make sure to like the video, subscribe, and check the description below for more resources.
Step 1: Confirm the Appointment Before You Even Show Up
Before the day of the detail even arrives, I always confirm the appointment about two days in advance.
I’ll call, text, or email the customer and simply say something like:
“Hey, just confirming we’re still on for Monday at 8:00 AM.”
This does a few important things:
- It avoids no-shows
- It shows professionalism
- It gives the customer a chance to reschedule if something changed
During that confirmation, I also ask how they prefer to be contacted when I arrive. Some customers prefer a text. Others want a phone call. Some don’t want to be disturbed early in the morning because of kids, work schedules, or sleeping family members.
So I’ll ask:
“When I arrive, would you prefer I text you or give you a call?”
That small detail makes the experience much smoother and more respectful.
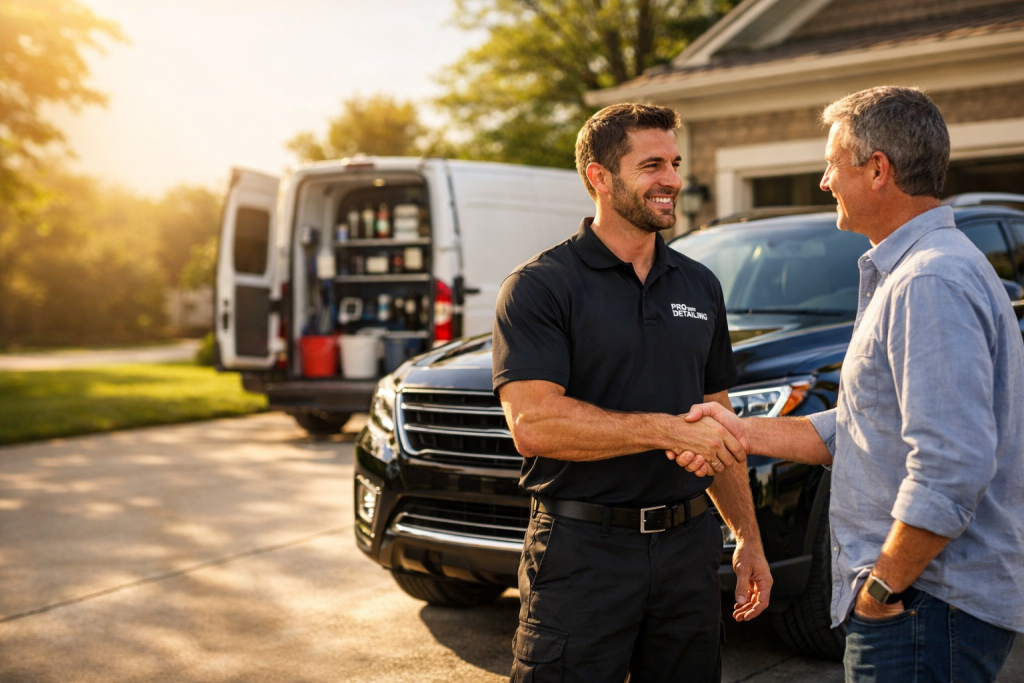
Step 2: Arriving at the Location and Parking the Right Way
When I arrive, I don’t immediately pull into the driveway. Instead, I wait and speak with the customer first.
The reason for this is simple: I want to confirm where I’ll be working and make sure I’m not in anyone’s way.
I usually prefer working outside if possible—especially if the sun isn’t extremely harsh—because natural light reveals more than artificial lighting. Garages can be tight, dark, and inconvenient, especially if there’s another car inside.
Before pulling in, I’ll ask:
- Is the driveway clear?
- Will anyone need to move their car?
- Will I need to relocate my setup at any point?
This prevents interruptions later. The last thing you want is to be halfway through a detail and suddenly hear, “Hey, can you move your stuff real quick?”
Once everything is confirmed, I pull in in reverse, since it gives me easier access to my equipment and tools.
Step 3: Greeting the Customer and Building Rapport (Without Wasting Time)
After parking, I walk up and greet the customer by name. That’s important.
“Good morning, John.”
“Good afternoon, Robert.”
Then I engage in light small talk, usually anywhere from one to five minutes.
This can include:
- Talking about their car
- Asking how long they’ve owned it
- Mentioning the neighborhood
- Asking what they do for work
Customers appreciate this because it builds trust and makes the interaction feel personal.
However—and this is critical—you must stay time-conscious.
It’s very easy to get caught in long conversations, especially if the customer likes to talk. But if you have multiple jobs that day, losing 30–60 minutes early can throw off your entire schedule.
So yes, be friendly—but always remember: you’re running a business.
Step 4: Walk Around the Vehicle and Identify Their Main Concern
Before starting the detail, I always ask one key question:
“Is there anything specific you’d really like me to focus on today?”
Every customer has one thing that bothers them more than anything else:
- A stain
- A scratch
- Pet hair
- A bad smell
Even if you make the entire car look great, if you miss that one thing, it’s all they’ll notice.
I’ll walk around the car with them, open doors, pop the hood if needed, and let them point out problem areas. This also gives me a chance to set expectations.
If there’s a stain or issue that might not fully come out, I explain that upfront. Clear communication here prevents disappointment later.
Step 5: Explain the Process and Start the Job
Once everything is clear, I let them know I’ll get started and explain how I’ll contact them if needed.
I’ll say something like:
“If I need anything, I’ll text you or ring the doorbell. Otherwise, I should be good to go.”
They’ll show me:
- The electrical outlet
- The water source
Once that’s done, they head inside—and now it’s time to work.
Step 6: Set Up Efficiently Without Making a Mess
My setup process is simple and minimal. I don’t unload everything at once.
I only bring out:
- The tools I need for that specific step
- The towels I’ll actually use
- One main cleaner (usually APC)
For example, during interior detailing, I won’t bring out the vacuum right away if I don’t need it until the end.
This approach:
- Keeps me organized
- Makes cleanup faster
- Looks more professional to the customer
It may take a few extra steps walking back and forth to the van, but it saves time overall—especially when breaking everything down later.
Step 7: Work Methodically and Stay Organized
As I complete each step, I put tools away once I no longer need them. I don’t let equipment pile up.
This helps in two ways:
- It prevents clutter and accidents
- It mentally signals that I’m nearing the end of the job
Seeing fewer tools out actually gives me a boost of energy because I know I’m wrapping up soon.
Step 8: Wrapping Up and Reviewing the Results With the Customer
Once the job is done, I contact the customer and walk them around the vehicle.
I explain:
- What was done
- Any limitations
- Any areas that improved significantly
I answer questions before they ask them. That builds confidence and trust.
After that, it’s light conversation again, payment is handled, and I pack up the final items.
Final Thoughts: Improve With Every Detail
This is a general framework, not a rigid rulebook. As you gain experience, you’ll refine your own process.
The key takeaway is this:
Always look for ways to improve—faster setup, better communication, cleaner workflow.
A few seconds saved here and a few minutes saved there add up over months. That’s how you become more efficient, more profitable, and more professional.